http://www.moldus.org/~laurent/GNUstep/OS42_Install.html
 VMWareFB.zip
VMware 3.0 and VirtualBox 1.5.x
Version 1.11 - Feb 17th, 2008
Version 1.10 - Jan 14th, 2004
Version 1.06 - Feb 24th, 2002
Laurent Julliard
Visitors:
Original page at http://www.moldus.org/~laurent/GNUstep/OS42_Install.html
UPDATE:The instructions below have also been used successfully to install OpenStep 4.2 on a VirtualBox virtual machine (version 1.5.4).
Preamble
Being a GNUstep developer I find it very handy to have the original OpenStep software at hand to quickly check something about OpenStep original look and feel or APIs. Having a second PC just for the purpose of running OpenStep is not very practical: first because the hardware supported by OpenStep 4.2 is now getting out of date and second because interrupting your development work and reboot is really tedious. Of course you also have the option of buying one of these wonderful original NeXT black hardware... In this case I wish you good luck! (I have one of these by the way ;-).
So one day I decided that it would be really cool and very handy if VMware could host OpenStep 4.2 for Intel. A quick search in the comp.sys.next.* and vmware.* newsgroup did not prove very useful and the various attempts apparently failed... This is where I decide to try it by myself and after many hours of trial and error I was able to make it work !!
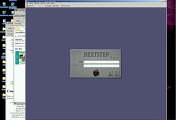
Just to prove that it really works and before we jump into the installation let's have a look at a couple of screenshots showing VMware running OpenStep 4.2:
- Screenshot 1 showing OpenStep 4.2 running with the default VGA driver (640x480 B&W)
- Screenshot 2 showing OpenStep 4.2 running with the Bill Bereza's SVGA driver (800x600 true color)
The procedure below was documented using VMware 3.0 for Linux and Windows. Ken Turner reported a successful installation with VMware 3.0 running on Windows XP. In any case I recommed that you also read Ken's web page especially because it speaks about the installation of OpenStep 4.2 in the Virtual PC software)
Disclaimer
This page has been put together on a voluntary basis. I offer absolutely no guarantee what soever that the installation will work for you. I take no responsibility for loss of data or system corruption caused by use or misuse of software cited on this page. Also note that VMware does not support OpenStep 4.2 for Intel. If you have questions send them to me (laurent AT moldus DOT org) or even better to the vmware newsgroups (news.vmware.com)
Credits
A big thank to:
- the GNUstep project and its community for keeping me awake at night :-)
- Alex Protopopescu <lipi AT flounder DOT vmware DOT com> from VMware who gave me the very last little trick to make VMware work properly
- Uli Zappe <uli AT ritual DOT org> for posting a message in the comp.sys.next.hardware newsgroup that helped me solved the problem with the buggy OpenStep rc.cdrom script.
- Kent Adler <kadler AT vmware DOT com> from VMware Inc. who has generously donated 4 VMware workstation 3.0 licenses to developers working on GNUstep.
- Bill Bereza, Frederic Stark, Peter Rasmussen for developing an Openstep SVGA driver for VMWare.
Pre-requisites
- VMware
- Get the latest version of VMware from www.vmware.com. I personally used VMware Beta 3.0 (with an evaluation license) for Linux. It may work with VMware 2.x but I've not tried It may also work for VMware for Windows but I haven't tried that either (feedback welcome).
- OpenStep 4.2
- Of course you must have OpenStep 4.2 for Intel CDs at hand: the User CD and possibly the Developer CD if you want to install the development tools
- Then you need the OpenStep 4.2 Installation floppy (boot floppy). Get it from the Apple Support Site (Here is also a local copy but use the Apple site first to preserve my poor network bandwidth....)
- You also need the Device Drivers Floppy.
Problem is that the original floppy from the Apple FTP site does not contain the drivers we need (the latest version of the EIDE (v4.03) and EISA drivers (v4.05) are required). So it means I had to build my own. Plus there is a bug in the /etc/rc.cdrom install script on the OpenStep 4.2 User CD which makes it impossible to install the PIIX variant of the EIDE driver on the Hard Disk !!! So go and get my customized Device Driver Floppy image or it won't work.To build the floppies from the images, insert a blank floppy in your floppy drive and type the following command:
dd if=name_of_the_floppy_image of=/dev/fd0
And now let's go !!
VMware Installation and Configuration
To install VMware just follow the normal procedure.
- Install the VMware RPM and after installation run vmware-config.pl.
- Then launch VMware and use the Configuration Wizard to create a new virtual machine.
- Eventhough we are installing OpenStep 4.2 make sure you choose Linux as the Guest OS for this virtual machine.
- For Windows users: choose the "Custom" configuration in the Configuration Wizard
- Allocate 32MB of memory (or more if you have plenty of RAM). Size a virtual IDE disk of about 600 MB and finish the Wizard.
- For Windows users: at the last step of the Configuration Wizard, choose "Advanced>" and changed the hard drive to IDE 0:0.
- For Windows users: at the last step of the Configuration Wizard, choose "Advanced>" and changed the hard drive to IDE 0:0.
- Then click on the Settings->Configuration Editor. We are now going to tune our Virtual machine settings
- Go to the IDE section and open it.
- For Linux users: remove the CDROM device that is by default configured as a master on the secondary IDE channel. Then re-create the CDROM as a slave unit on the primary IDE channel (the same as the one for the IDE disk). Make the CDROM point to /dev/hdc (or whatever Linux device your CDROM is connected to). Check the Start Connected box. Then Save.
- For Windows users: just modify the existing CDROM device to 0:1 IDE, and enable raw access. Then Save
- That's it for the moment (I did not configure any ethernet, serial or parallel port to start with). Save your virtual machine configuration.
OpenStep 4.2 Installation and Configuration
Part 1: Installation of the OS Basics
- Insert the OS 4.2 Installation in the floppy drive, the OS USer CD in the CDROM drive and "Power On" your virtual machine. When the boot prompt appears on the screen type -s to boot in single user mode. Then answer a couple of questions about language, keyboard, etc...
- When asked, insert the Device Drivers floppy (the customized one!)
- Then OS asks you to tell what driver must be used for your CDROM drive. A list shows up. Type 7 twice to go to the end of the list and choose driver #2 "Intel PIIX PCI EIDE/ATAPI Device Controller (v4.03)...."
- OS then asks the exact ssame question for your Hard disk. Do the same as before. Type 7 twice and finally choose 2 again (yes I know it's the same driver but don't worry)
- At that point you are asked if you want to load additional drivers. Say yes : type 2, then 7 and finally choose the Floppy Disk Driver (6).
- Then type 1 to continue.
- At this point you should see the boot screen with loads of messages. Verify that both the Hard disk and the CDROM are detected ok. Then you get the shell prompt (#). Make sure the Device Driver floppy a) is still in the floppy drive and b) is writable. Then type:
mount -n /dev/fd0a /install
sh /install/rc.cdrom - From there the installation should go smoothly, choose the entire virtual hard disk for installation.
- At the end you of the installation you'll see a message saying "Patching the EIDE driver....". Then 2 lines about problems related to ejecting the floppy. Don't pay attention to it.
- DO NOT REMOVE THE FLOPPY YET. Press return as requested and wait for the virtual machine to reboot. Then remove the floppy.
- End of the first phase.
Part 2: OS Configuration
- Shortly after restarting, you should see the OpenStep Welcome Screen (loading Openstep, Reading Openstep Configuration,etc...)
- Then OS wants to load the EISA driver again. Insert the Customized Device Driver Disk as requested and type 1
- Then you go through the Startup Phase (nothing asked and it finally says startup complete)
- An alert box will show up asking you to load the EISA driver from the floppy disk. Insert the floopy and click OK
- Then comes the Configure Panel
- Click on the Display icon and choose "Default VGA" as the display driver if you are using VMWare. I tried the SVGA but it then gives a black scree so it looks like VMware does not support the 0x6a VESA mode.
With VirtualBox you can choose the "Generic SVGA" driver down the list. It works well and will give you a more comfortable 800x600 screen resolution. - Do not install other peripherals for the moment. Just click on the Save button.
- Click on the Display icon and choose "Default VGA" as the display driver if you are using VMWare. I tried the SVGA but it then gives a black scree so it looks like VMware does not support the 0x6a VESA mode.
- End of configuration phase
Part 3: Software components Installation
When you see the Install NextStep dialog box on the screen proceed as for a normal OpenStep installation. Choose the software components you want install. Then click on "Install". At the end of this installation phase OS restarts and then you'll be automatically put in the OpenStep desktop under the default "me" user.
From here do the following
- Run the Preference application (Double click on the clock icon)
- Click on the Lock icon and choose a password for the "me" user
- logout. The login screen should pop up on the screen this time
- Type root in the login field and no password.
- Once on the desktop put the Developer CD if you have one in the CDROM
- Go into the Developer CD/NextCD/packages and install the following packages (in this order):
- DeveloperTools
- DeveloperLibs
- DeveloperDoc
Part 4: Fine tuning the drivers setup
Now that you have a working system, you can install a couple of other drivers to enhance your OpenStep system:
- Network: From Ken Tuner's Web page and the feedback I have from other users, it sounds like the network interface works (sort of) ok using the AMD PCnet-32 Ethernet driver. The networking setup is standard VMware bridged network and standard OS42 network - AMDPCnet32NetworkDriver. Peter Rasmussen <rasmus AT interactive-technology DOT com> however reported packet loss problem with this driver. So any help/hint is welcome here
- Display: Out of the box, only the VGA (640x480 black and white) OpenStep driver works ok with VMware. Fortunately Frederic Starck and Peter Rasmussen put some code together and we now have a working (though very alpha) OpenStep SVGA driver.
- Frederic Starck <fred AT almonde DOT com> has a Windows SVGA driver that will work for OpenStep 4.2 installed on VMWare for Linux
- Peter Rasmussen <rasmus AT interactive-technology DOT com> modified the original code and made a Linux SVGA driver that works if you have VMware running on Linux
- Bill Bereza <billbereza@ AT tomicobject DOT com has also developed a SVGA driver for OpenStep that works with VMWare for Linux and Windows. The driver works very well for Linux in full screen mode. It has some glitches on Windows (like the other drivers) due to a problem in VMWare for Windows. Detailed setup instructions are available on Bill's page.
To install these drivers, download one of the tar files above. Copy the file in your OpenStep environment and you can either rebuilt it from source or install the binary version of it directly in OpenStep. To do so follow the steps below- copy the *.config file to /usr/Devices
- open /NextAdmin/Configure.app
- select display drivers - it should be autodetected if this is your first driver else just click Add and select it from the list
- save and reboot your virtual OpenStep machine
- Audio: Alejandro Diaz Infante (aka astroboy) managed to make the OpenStep Sound Blaster driver work under VMWare. Installation steps are documented here.
- Serial Port: serial port is an easy one. Follow theses steps as documented by astroboy on the Next Information Archive (assuming you are using COM1 port aka /dev/ttyS0 on Linux):
- In VMWare setup COM1 in Serial Ports Section to Type: "Device", Path: "/dev/ttyS0", and checked "Start connected"
- The IO Device Configuration of the first serial port in VMware BIOS was set to "Auto"
- In Configure.app, OpenStep automatically added Serial Port v. 4.00 during setup, so I just added TTY Port Server.
- If you have a Hayes compatible modem connected to your serial port then follow all the instructions contained in OpenStep&PPP Part 1 and Part 2 by Brian Wotring.
- Others: astroboy has succeeded in installing a number of other drivers. See details here. If you succedeed in installing any other kind of device drivers (serial, parallel port,...) then let me know.
Conclusion
Hope you enjoyed the trip! And that you are now having fun with OpenStep 4.2 in VMware. Pending problems where contribution would be welcome:
- It is a bit slow... Which I think is rather normal because:
- I was using VMware 3.0 beta which runs in Debug mode and is said to be substantially slower than the final release. ( UPDATE: I do confirm that the final version is much faster than the beta version. Response time is good even on my modest Pentium III 400 Mhz laptop)
- There is no VMware tools to optimize OpenStep display, etc. as there are for Linux or Windows guest OS.
- It would be great if sbdy could find a way to put the SVGA driver to work... 640x480 is really small. Or if any other display driver works please let us know.
UPDATE: we now have a SVGA driver working! See device driver section just above
Comments, feedback, ideas welcome.
Laurent Julliard <laurent AT moldus DOT org>
'5. NeXTSTEP' 카테고리의 다른 글
| OpenStep VMWare Display Driver (0) | 2009.05.11 |
|---|---|
| NEXTSTEP 3.3J on VMWare3.0 (0) | 2009.05.11 |
| How to Install NexStep 3.3 on Virtual PC 4.2/5+ (0) | 2009.05.11 |
| OPENSTEP on Windows PC Emulators (0) | 2009.05.11 |
| NeXT cpu 68030 Cache_Design (0) | 2009.05.11 |
댓글